
Creating visual effects that simulate real-world phenomena, such as black holes, requires an understanding of both shader programming and astrophysics. This guide will walk you through creating a dynamic black hole shader with gravitational lensing effects in Unreal Engine using HLSL (High-Level Shading Language). We’ll explore how to build the shader from scratch, code the lensing effect, and make the environment dynamically rotate around the black hole.
What We’ll Cover:
- Understanding the Basics of Gravitational Lensing
- Writing the HLSL Code for the Shader
- Integrating the Shader into Unreal Engine
- Applying the Shader and Testing
1. Understanding the Basics of Gravitational Lensing
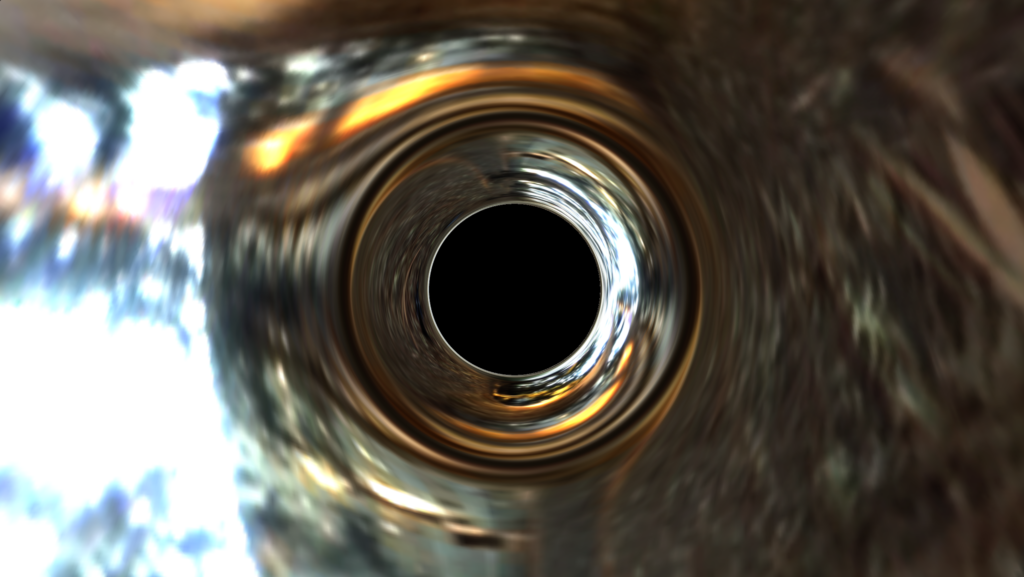
In astrophysics, a black hole’s intense gravitational field bends light around it. This creates a “lensing” effect where light near the black hole appears distorted, allowing us to see the regions behind it. Our shader will simulate this effect by warping a cubemap texture around the black hole.
In ShaderToy or Unreal Engine, we can simulate this by:
- Casting rays from each screen pixel toward the black hole.
- Modifying the direction based on simulated gravitational forces.
- Sampling a cubemap based on this modified direction.
2. Writing the HLSL Code for the Shader
We’ll start with an HLSL function that calculates the gravitational lensing effect. The function will:
- Cast a ray toward the black hole.
- Apply a rotational transformation to simulate the black hole’s dynamic environment.
- Fade to black as rays approach the center to maintain the illusion of a dark singularity.
Here’s the HLSL code for our shader:
https://www.shadertoy.com/view/X32fDm
void mainImage(out vec4 O, vec2 u) {
    // vec2 R stores the screen resolution passed to the shader.
    vec2 R = iResolution.xy;

    // d is the initial distance from the black hole (camera distance).
    // l is a variable used for the loop to track the updated distance.
    float d = 5., l = d, k;

    // V is a 3D vector representing the direction from the camera to the pixel being rendered.
    // It normalizes a vector where the x component is based on screen aspect ratio and y and z
    // are based on the pixel coordinates (u) passed in. It simulates a ray from the camera.
    vec3 V = normalize(vec3(.447 * R.x, R - u - u)),
         P = vec3(-d, 0, 0),  // P is the starting point of the ray in 3D space.
         c;                   // c is a temporary vector used later for calculations.

    // This loop iterates as long as l (distance from the black hole) is within a valid range.
    // It updates the ray's position and direction based on gravitational influence.
    for (O *= 0.; l < d + d && l > 1.;) {
        // k is a small step size based on the current distance.
        k = 0.1 * l;

        // Update l to be the length (distance) of the new position vector P after moving along V.
        l = length(P += V * k);

        // Apply gravitational lensing effect by adjusting the direction vector V.
        // The cross product of V and P creates a perpendicular vector c.
        // Dot product is used to project the effect of gravitational pull on V.
        // The result is scaled based on the distance (l) raised to the power of 5.
        V -= k * dot(c = cross(V, P), c) * P / pow(l, 5.);
    }

    // Rotate the direction vector V based on time (iTime) to animate the cubemap.
    float angle = iTime * 0.02; // Rotation speed
    float cosA = cos(angle);
    float sinA = sin(angle);

    // Rotation around the Y-axis
    mat3 rotationMatrix = mat3(
        cosA, 0.0, -sinA,
        0.0, 1.0, 0.0,
        sinA, 0.0, cosA
    );

    // Apply the rotation matrix to V
    vec3 rotatedV = rotationMatrix * V;

    // Sample the cubemap texture using the rotated vector.
    vec3 cubemapColor = texture(iChannel0, rotatedV).rgb;

    // Fade to black as we approach the center of the black hole.
    // The closer l is to 1 (the center), the darker the color.
    float fade = smoothstep(0.0, 1.0, l - 1.0);
    vec3 finalColor = mix(vec3(0.0), cubemapColor, fade);

    // Output the final color.
    O = vec4(finalColor, 1.0);
}
Explanation of the Code
- Variables:
dandlrepresent distances, wheredis the initial distance from the black hole, andltracks the ray’s distance. - Ray Direction:
Vis the direction vector, andPis the ray’s starting point in space. - Lensing Effect: We calculate gravitational lensing by adjusting
Vbased on distance from the black hole. Thecrossproduct creates a perpendicular vector, and thedotproduct is used to project gravitational forces onV. - Rotation: A rotation matrix simulates the rotation of the environment around the black hole over time.
- Cubemap Sampling:
SampleCubesamples the cubemap based onrotatedV, the rotated direction vector. - Fade to Black: As the ray approaches the center of the black hole, the shader fades to black using
lerpfor a smooth transition.
3. Integrating the Shader into Unreal Engine
Step 1: Create a New Material
- In Unreal, create a new material. Name it something like
M_BlackHoleShader. - Set the material’s Shading Model to Unlit, as we won’t be using Unreal’s lighting.
Step 2: Add a Custom HLSL Node
- Inside the material, add a Custom node.
- Set the Output Type to
Float3to return RGB values. - Paste the HLSL code snippet above into the Code field of the Custom node.
Step 3: Set Up Inputs for the Shader
Define the following inputs in the Custom node to pass the required data to the shader:
- UV (Float2): Connect to the screen space UVs using a
ScreenPositionnode. - CameraPosition (Float3): Connect to the
CameraPositionWSnode. - Time (Float): Use the
Timenode to control the rotation. - Resolution (Float3): Use a
Constant3Vectornode to input screen width, height, and depth (e.g., 1.0 for the third component). - CubeMap (TextureCube): Add a
Cube Textureparameter and assign your desired cubemap texture.
Step 4: Output to Emissive Color
- Connect the output of the Custom node to the
Emissive Colorslot of the material.
Step 5: Adjust Material Settings and Test
- Apply the material to a large sphere or object representing the black hole.
- Tweak parameters as needed to enhance the lensing effect and cubemap rotation.
4. Applying the Shader and Testing
With the shader applied, you should see the following effects:
- Gravitational Lensing: The environment appears to bend around the black hole.
- Rotation Animation: The cubemap rotates dynamically, simulating a rotating field around the black hole.
- Black Center: The shader fades to black near the center, preserving the illusion of the event horizon.
Final Thoughts
This black hole shader demonstrates the power of shaders for simulating complex astrophysical phenomena. The combination of HLSL and Unreal Engine’s material system enables detailed effects like gravitational lensing. You can adjust parameters, add textures, or experiment with different cubemaps to create a variety of looks.
Feel free to expand this shader with additional features, such as incorporating real-time data or interactive camera effects. This technique is versatile and can be a valuable addition to any space-themed project, adding a realistic touch to visual simulations of black holes. Happy rendering!
Leave a Reply